Github for Muggles
Git and Github are indispensable tools for building software applications but they can be overwhelming for non-technical founders. This post gives an overview of the key concepts to get started.

Unless you’re already a tech wizard familiar with using Git and Github for shipping software, it can be a daunting to get started with these tools. We’re going to demystify both Git and Github in this post and by the end you’ll have the necessary conceptual understanding to begin using this powerful platform to reliably build your app as a non-technical solo founder. Let’s start off with some backstory.
Origin Story
Git is the open source technology underpinning Github. It was created by Linus Torvalds, the creator of the Linux operating system. Git is his second amazing contribution to the world of computing and arguably has had as much an impact if not more in terms of total benefit to other software creators. Before Git, software developers relied upon less ideal platforms like Visual Source Safe, SVN and CVS for source control but Git fixed a lot of the deficiencies with these systems by offering a more flexible, efficient way of how it handles changes.
What are Source Control, Git and Github?
Source control (sometimes called “version control”) is the term of art for any system that allows you to reliably manage files in software development. Git is a source control system that makes it possible to collaboratively develop software with other people in a more sane manner and to manage your changes with peace of mind. You can build software without it but it’s a bit like rock climbing without a rope. You and I aren’t Alex Honnold - we use protection when climbing any structure above ten feet and we use source control when developing any software application that we want to build and maintain over time.
What is a commit?
If we follow the rock climbing analogy for a minute it gives a useful mental image because every time you check your source code into a source control system like Git, it’s like clipping into protection on a precarious rock face. As we scale the rock wall that is our increasingly-complex software project we want to periodically “clip in” so that we don’t fall all the way back to the ground in the event of a catastrophic mistake.
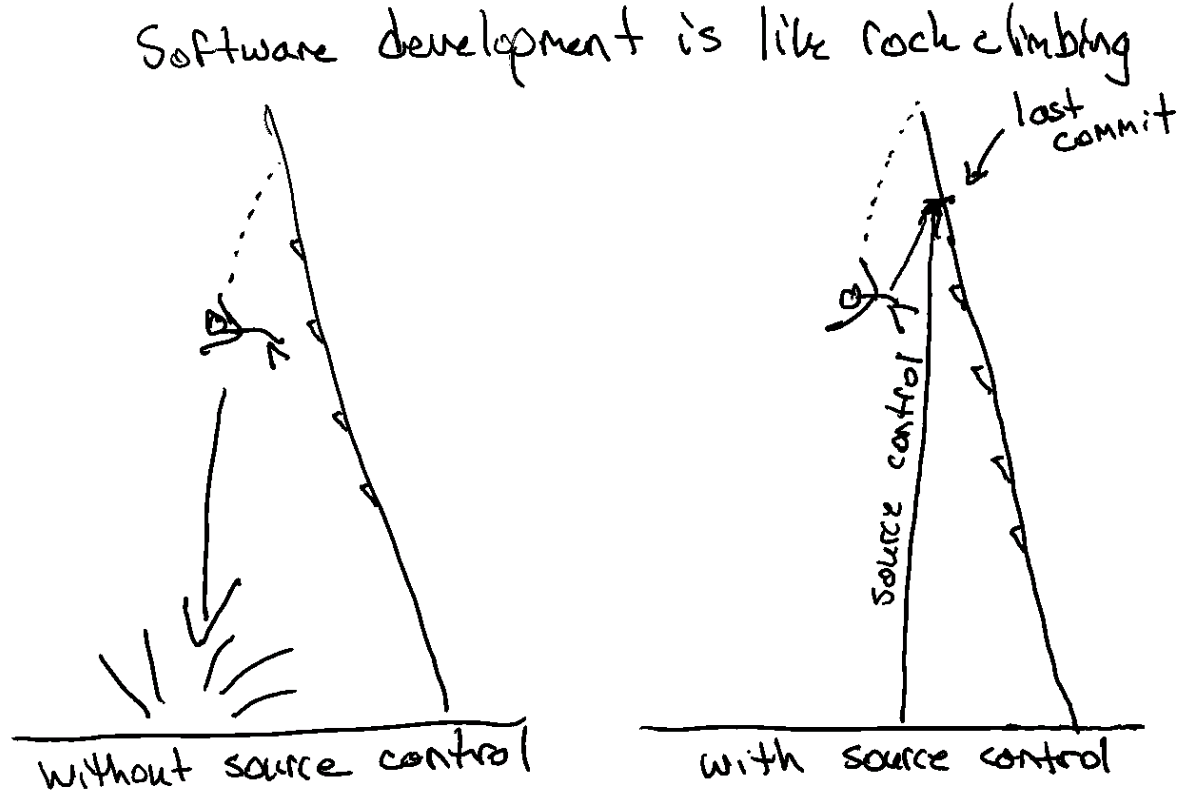
The way we “clip in” while climbing is by saving or “committing” our changes. Doing so gives us a save point or a “commit” that we can always revert to if things get messed up. This should give you great peace of mind because as long as you’re committing regularly at sensible progress points there are no fatal mistakes you can make while developing and the furthest fall you can ever have is to is the point of your last commit.
Setting up your first Github repo
If you use Confabulator on the last step it will create your Github repository (or repo). It takes the foundational files you developed (plus some other helpful scaffolding) and injects those into a new Github repo into your account. Obviously first you need to create your Github account and then grant Confabulator access (it will prompt you to do so when using it for the first time) but once you do that it has everything it needs to operate on your behalf and create new repos. The newly-created repo now exists on Github’s servers.
Understanding Local vs. Remote
We call this a “remote repository” (or repo) because it’s not stored locally - it lives remotely on someone else’s computer (in this case, Github’s). This is important to understand because until we clone that repo locally to our machine it only exists in the cloud. Once we clone locally though then Claude Code running on our machine can begin to work with the files. When you then commit code it’s storing those changes in a git repo that’s running locally on your machine and until you push that commit remotely to the Github repo (or “origin server”) those changes exist only on your laptop. So every time we make a commit and want it to end up in our Github repo there are actually two sequential steps happening: committing the code locally and then pushing that code remotely. If ever we have a teammate working in parallel and pushing their changes to Github and we want those changes we need to periodically fetch the remote repo to check status and pull down the new remote changes locally to incorporate them into our local instance.
The good news with this stuff is that Claude has a deep understanding of Git commands so you don’t need to memorize the nitty gritty syntax necessary to perform these operations. Once you’ve setup your local IDE (Integrated Development Environment - in our case Cursor) to talk to your Github repo and given Claude Code the necessary access to operate on your behalf by installing the Github CLI (Command Line Interface) or Github MCP (Model Context Protocol) you can just direct it in english and it will handle issuing the appropriate commands to do what you want. You only need to know conceptually what’s going on and have Claude Code execute your directives via natural language translating those into the necessary git commands.
What are branches?
When we’re working by ourselves on an early project, often we’ll develop directly on “Main” or the trunk of our tree if we use that analogy. It can be advantageous in different situations though to create a branch from the main trunk and do our work there. For instance when you have different developers or even entire teams working on different features, for sake of not stepping on each others changes, they’ll each be working on their own branch. You can think of a branch almost like an alternate timeline that splits from the base reality and goes off in another direction. You initiate this new timeline by checking out the code into a new branch that you name typically with a short descriptive name. You can have a whole set of changes occurring there and being committed without affecting the main timeline. Then when you’re ready for these changes to be incorporated back into production (the trunk or the live version of the app visible to the world) you can merge your branch.
What is a merge?
Merging is the process of incorporating the changes from one branch into another. Main is actually a branch itself - it’s the root branch so it’s technically the trunk, but it has all the same behavior of a branch. Once again you don’t need to worry about the specifics of how to merge. Once configured properly Claude Code will handle this for you and handle even sophisticated “branches of branches” merging strategies. The net net of merging to Main is that your changes get incorporated into your main timeline and therefore your production instance.
What is a merge conflict?
What happens if you and I have both created our own branches and are working on the same files and then go to merge? When this occurs you can end up with conflicting changes on different branches - this is called a “merge conflict.” If you used Confabulator to create your repo it takes an extra step and creates a dependency graph and git worktrees for your issues. These devices identify which github feature issues can be worked on in parallel and which require sequential development and in what order. This reduces the likelihood of merge conflicts when building the project. Even with these safeguards though sometimes merge conflicts are inevitable. Fortunately Claude Code is extremely good at resolving these. And worse case you can always revert to your last commit on one of the branches and have it do the work over from the new merged branch.
What are issues and epics?
Github issues are like support tickets independent of the code that are used to capture instructions about new features, bugs and any modification you intend to make to the source code. A typical workflow is to work with Claude Desktop or Claude Code to brainstorm a sensible feature and then have it create an issue representing what’s called an “Epic” for that feature. An Epic is a comprehensive summary of the requirements and acceptance criteria of a feature. It’s basically the “what” without the “how” of the specific implementation details necessary to make it real. This allows you to create new features agnostic of how they’re to be implemented and then delegate that job of translating those into detailed implementation issues to Claude Code. Claude Code has intimate familiarity with your codebase and therefore is better qualified to convert these logical requirements into an actionable implementation plan.
What are Github actions and CI/CD pipelines?
Github actions are recipes that can be set to run when code is committed. A common use case is to setup a Github action to push code into your deployment environment when it’s merged into your Main branch. You can get fancy and setup a gauntlet of different security and unit tests that check to ensure things work properly before code is allowed to be pushed to the Main branch. This is called a Continuous Integration / Continuous Deployment Pipeline and typically implemented once the cost of any downtime on the live site merits having a more bulletproof approach to ensuring no bad code is deployed. As you can imagine sites like Amazon and Facebook have rigorous CI/CD pipelines with extensive automated testing to minimize the chances of a bug making its way into the production environment. For early-stage founders though when working on your MVP before you have users a CI/CD pipeline is probably overkill and mis-spent calories and unnecessary friction early on. Once you have paying customers it’s a good idea to get a more disciplined approach to your deployment workflow.
How to revert if things get messed up?
Let’s say you’ve been developing your app and you’ve had a great idea for a feature and attempted to implement it but something got messed up and now your code doesn’t work. Assuming you haven’t committed it yet, all you need to do is revert back to a previous commit. That will preserve your changes in the commit history while allowing you to rollback the app to its prior state. Alternatively you can just backup your local .env file (where your API keys and variables are stored), nuke your local repo and clone your remote repo to your local machine again. That will put you back in the state of your last commit. If you happen to have checked in the bad code and pushed it to your remote Github repo it’s still no trouble because everything is versioned there so you can “peel off” the latest commit and have it revert to a previous commit. If you’ve ever used TimeMachine on MacOS it’s similar to reverting your filesystem to a previous state. If you want to preserve what you did instead of trashing it completely (maybe there was some useful functionality you created) you can have it store those changes on a side branch and revert the main branch to the last commit. Again Claude Code can handle these details for you so you don’t need to know the sophisticated commands to make all this happen, you just need to know it’s possible.
Linking commits to issues
Issues can be resolved by one or more commits and commits may contain code that resolves multiple issues. A good strategy is to link your commits to the issues they resolve. If you’re using the process taught in my course then Claude Code is already linking your commits to issues. This is valuable because it allows you to cross-reference things and later determine which commits were responsible for which features and bugfixes.
Where to go from here
Git and Github are powerful systems that can do so much more that what we’ve covered here but this short intro gives you the 80/20 primer of what you need to know to get started using them. Taking my course gives you the “just-in-time learning” approach to this stuff where we dive in the deep end and start using them and then backfill the explanations as we go along. If you want a more methodical, Github-focused, comprehensive course this Udemy course is a great way to get deeper on this foundational tech that you’ll use on every project.
And now you have all the foundational understanding of a fledgeling Github wizard. Please report to platform 9 3/4 to build your first app using Github. Try Confabulator for your next project if you haven’t already as it helps with the ideation and setup of your github repo when beginning a new vibecoding project. 🦉🪄